| These are instructions on how to perform an untethered jailbreak of your iPhone 4 on iOS 5.0.1 using PwnageTool for Mac. PwnageTool will let you customize your IPSW to prevent baseband updates and include Cydia packages. Step One Make a folder called "Pwnage" on the desktop. In it, you will need a couple of things. PwnageTool 5.0.1 which can be download from here. You will also need the 5.0.1 iPhone 4 firmware which can be found here. When downloading the IPSW file, it is best to download it with Firefox since Safari often auto extracts it! 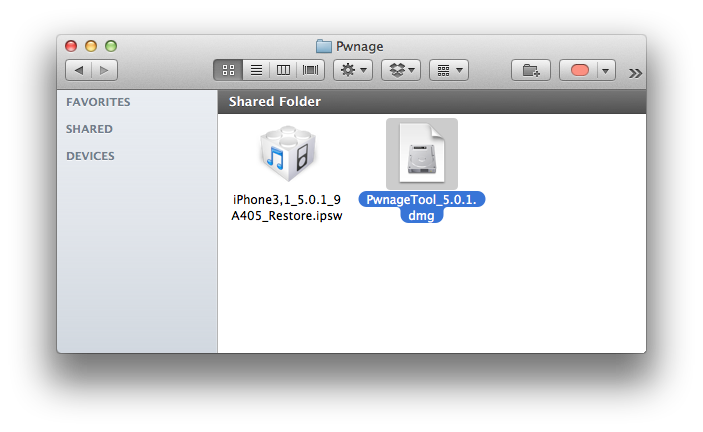 Step Two Double click to mount PwnageTool then drag the PwnageTool icon into the Pwnage folder. 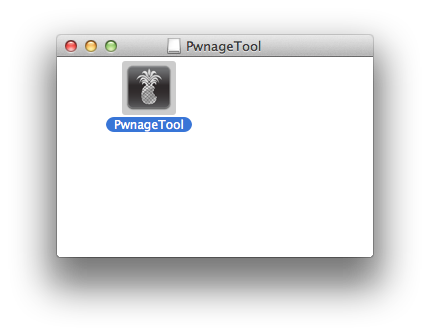 Then from the Pwnage folder double click to launch the PwnageTool application. 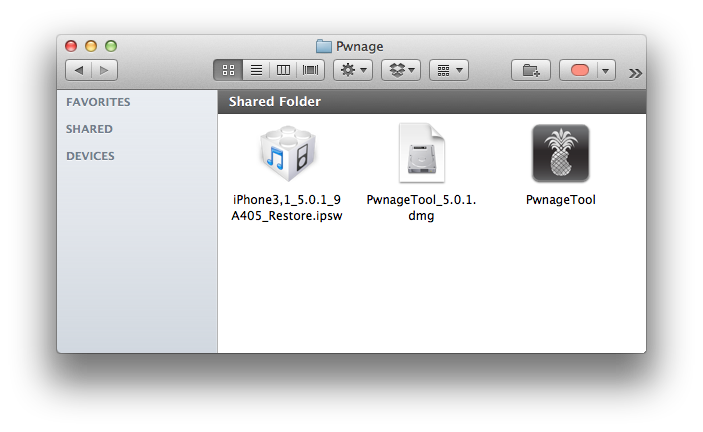 Click Ok if presented with a warning. 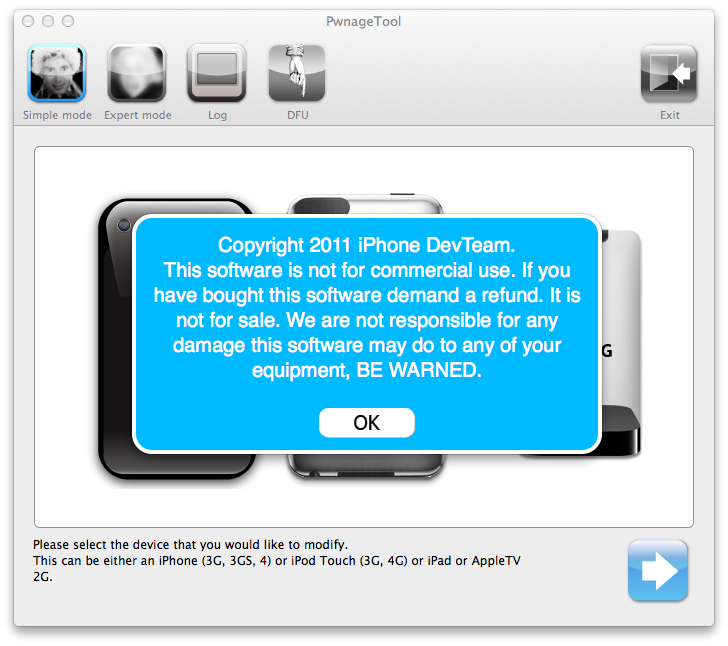 Step Three Click to select Expert Mode from the top menu bar 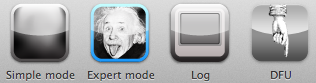 Step Four Click to select your device. A check-mark will appear over the image of the device. Click the blue arrow button to continue. 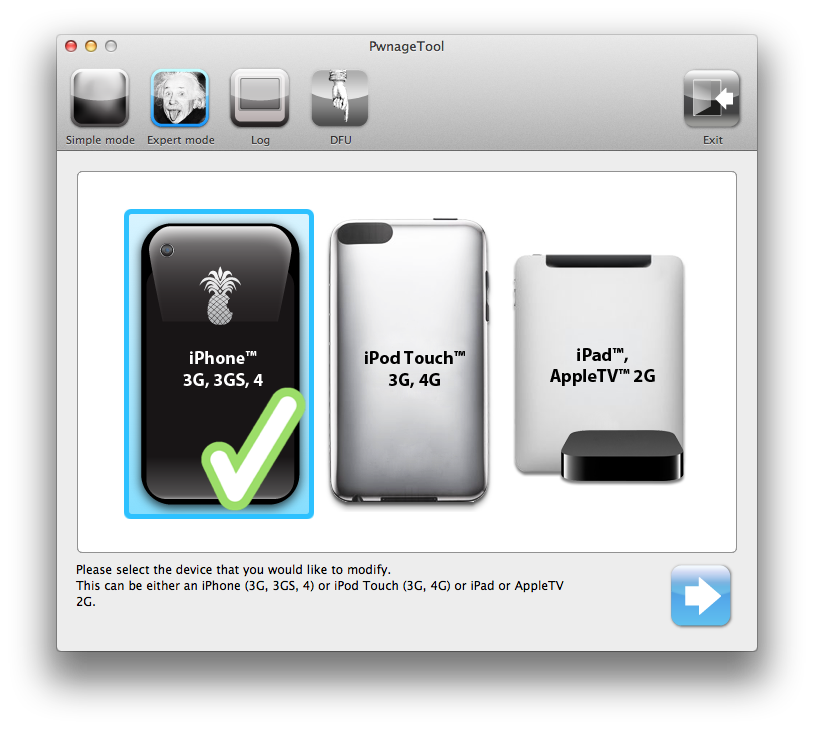 Step Five You will be brought to the "Browse for IPSW" page. Click the Browse for IPSW... button. 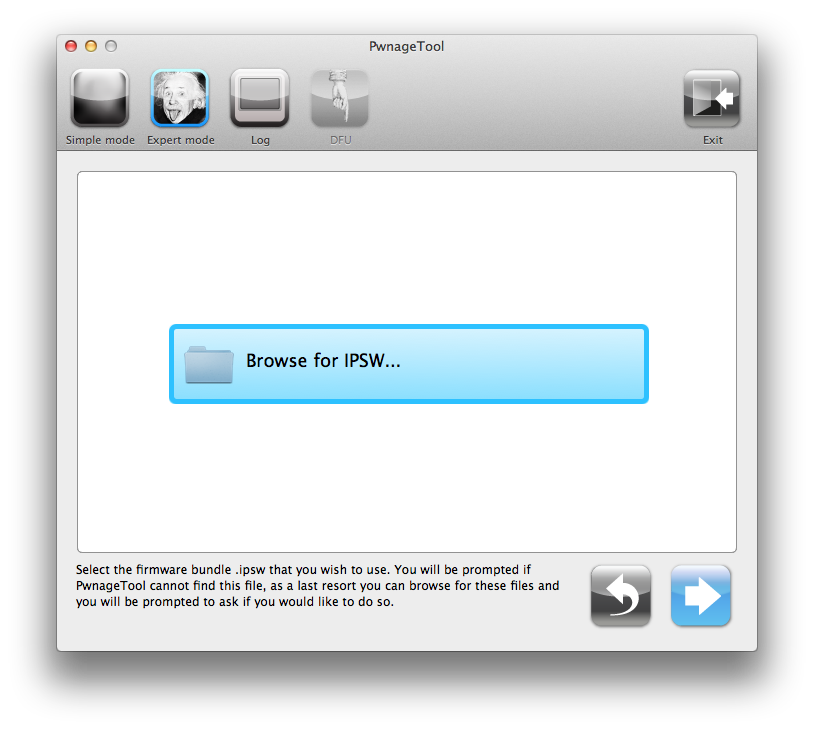 From the popup window select your firmware from the Pwnage folder then click the Open button. 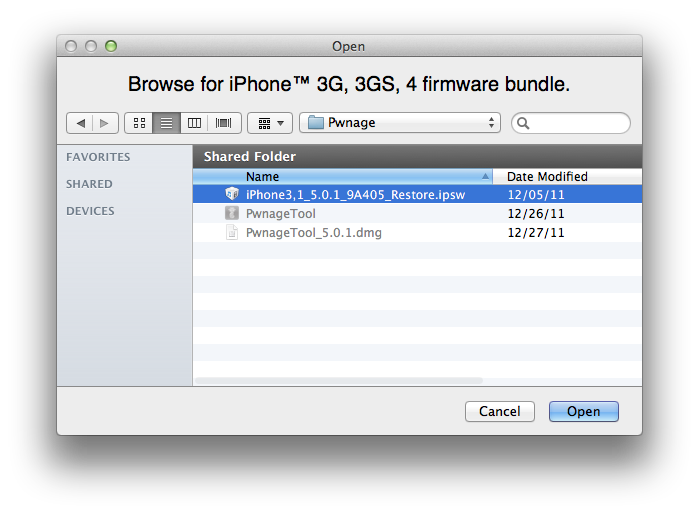 Step Six You will then be brought to a menu with several choices. Click to select General then click the blue arrow button.  The General settings allows you to decide the partition size. Check Activate the phone if you are not with an official carrier then click the blue arrow button. NOTE*: Deselect Activate if you have an iPhone legitimately activated on an official carrier. 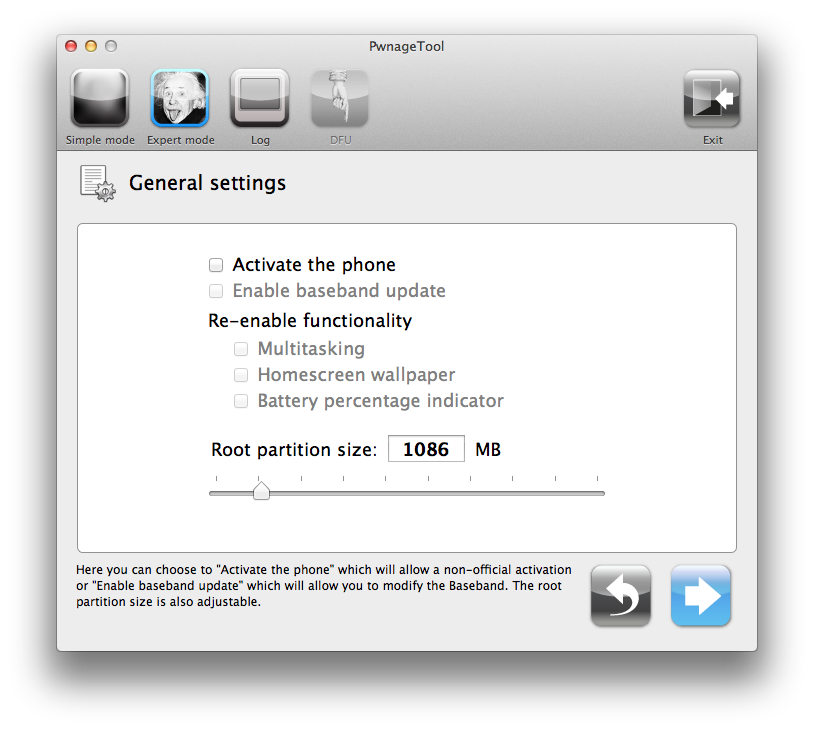 The Cydia settings menu allows you to create custom packages so you do not have to manually install the necessary them later. 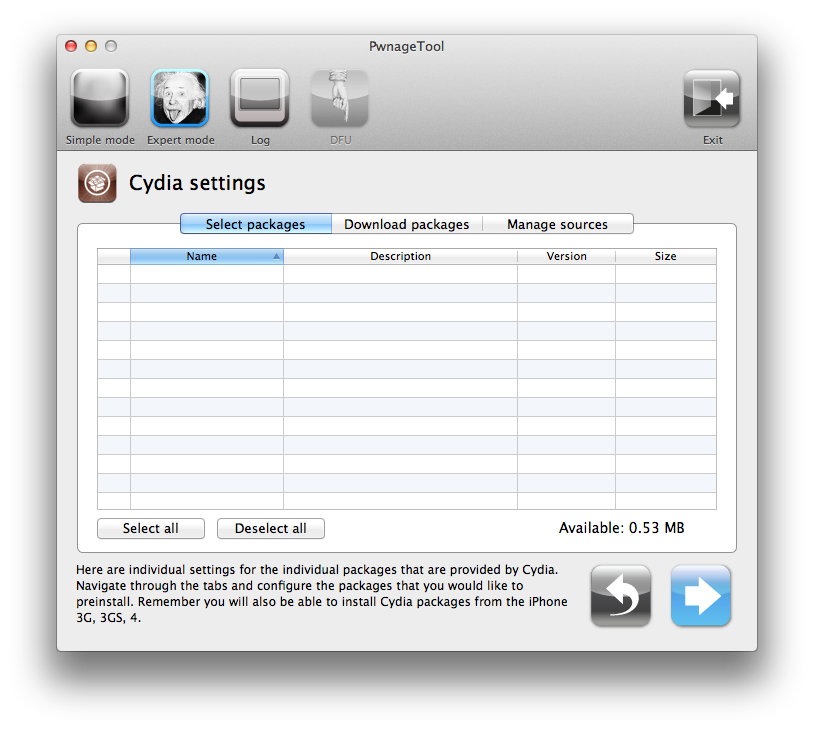 Click to select the Download packages tab. Then click the Refresh button to display all the available packages. Double clicking the package you want will download it and make it available in the Select Packages tab. 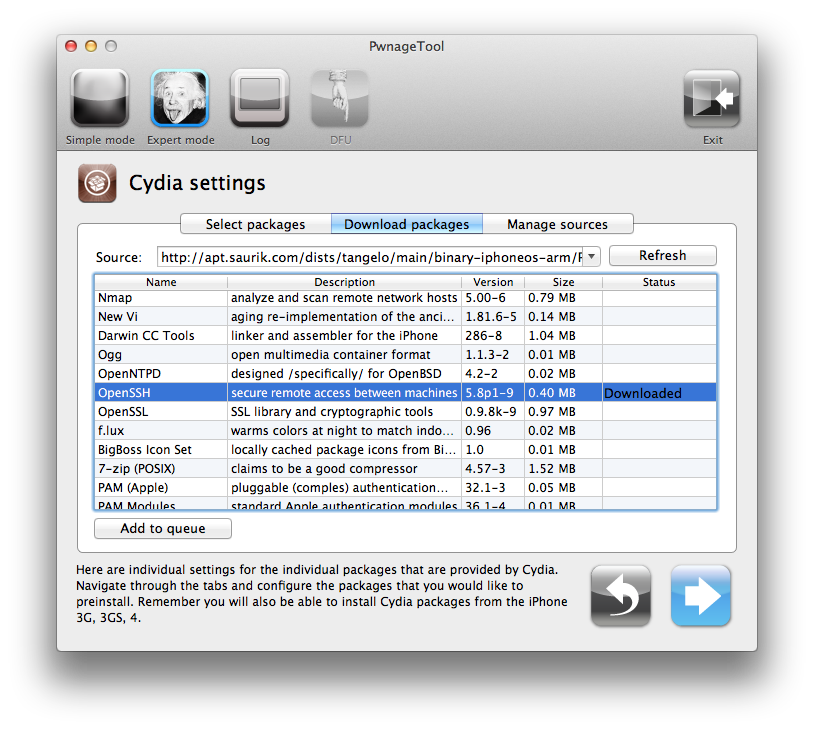 Checkmark the ones you want then click the blue arrow button. 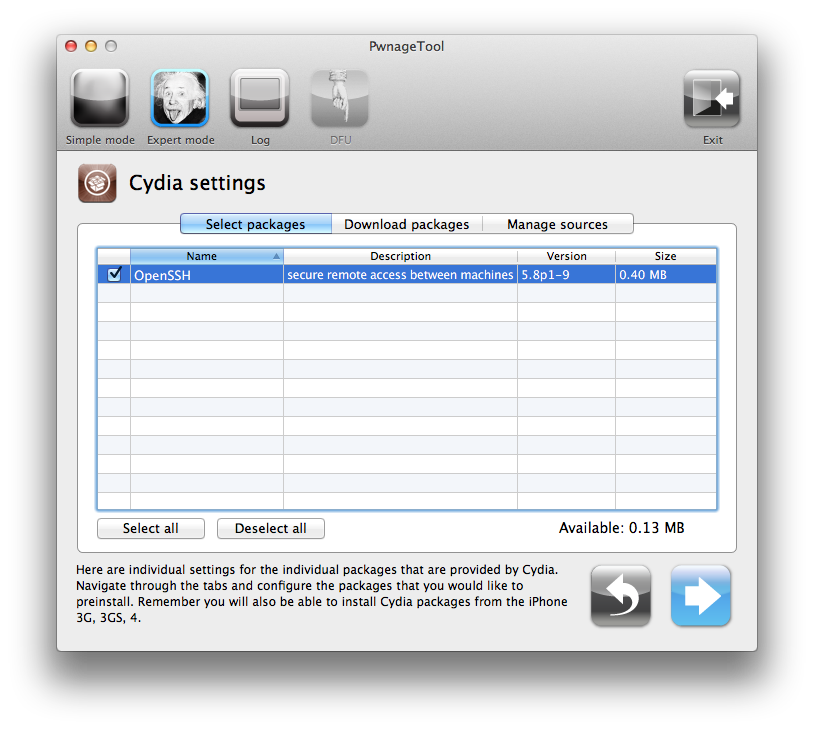 The Custom Packages Settings menu displays listed package settings for your custom IPSW. For know leave these settings as is. Click the blue arrow button to continue. 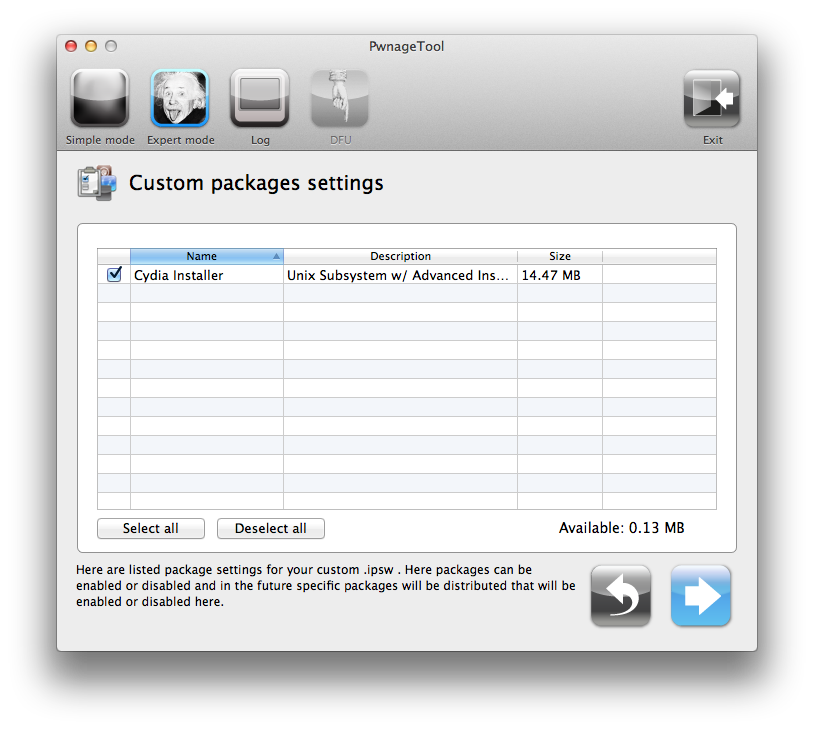 Step Seven You are now ready to begin the pwnage process! Click the Build button to select it then click the Blue arrow button to begin. 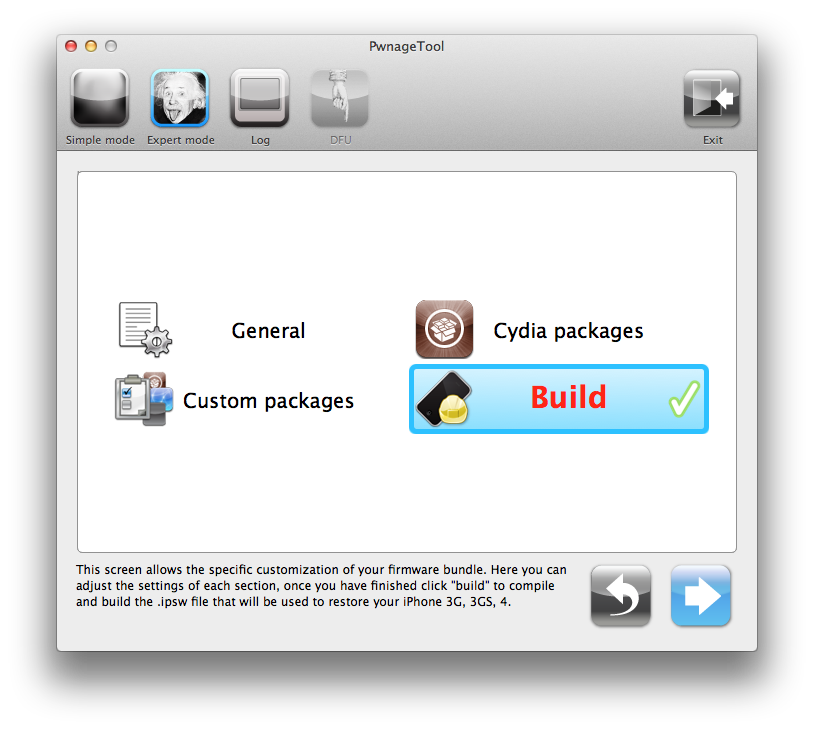 Step Eight You will be asked to save your custom .ipsw file. Save it to your Pwnage folder you created on your Desktop. 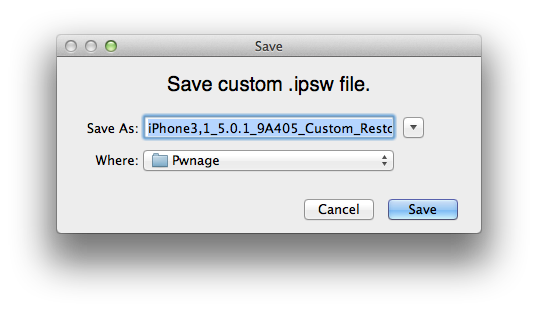 Your IPSW is now being built. Please allow up to 10 minutes. 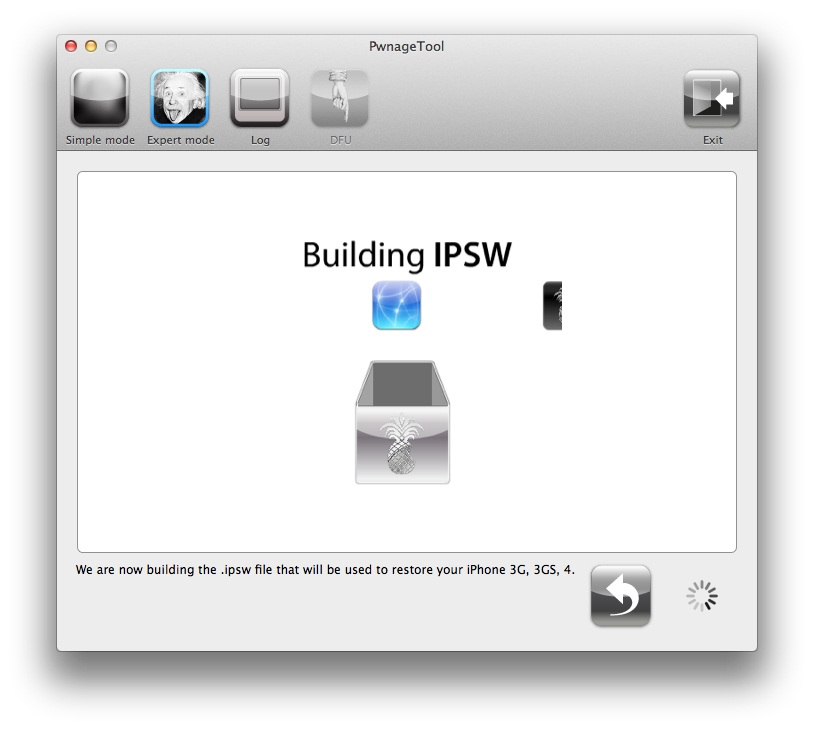 You will be asked to enter your administrator password. Do this then click the OK button. 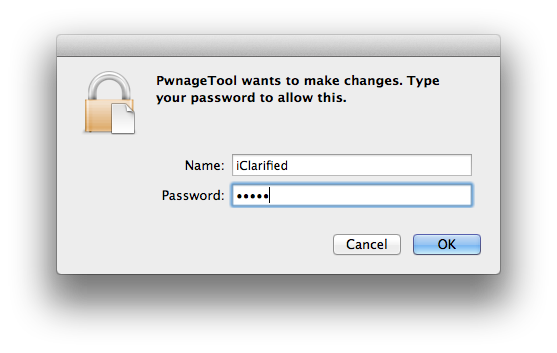 Step Nine Once your ipsw has been built you will be asked to connect your iPhone to the computer. Once it detects your device PwnageTool will guide your through the steps to putting your iPhone into DFU mode. 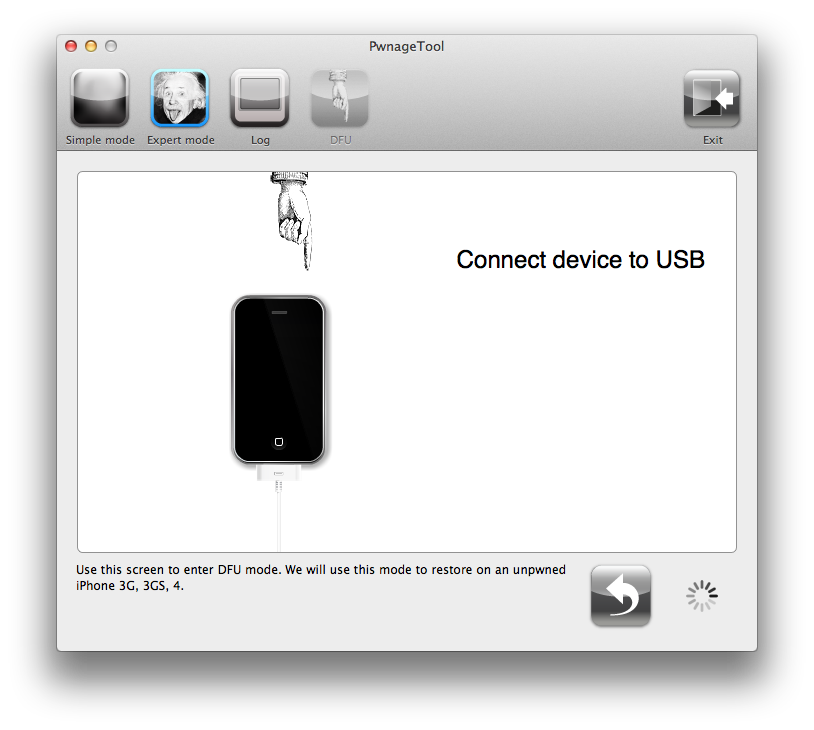 Press and hold the power and home buttons for 10 seconds. 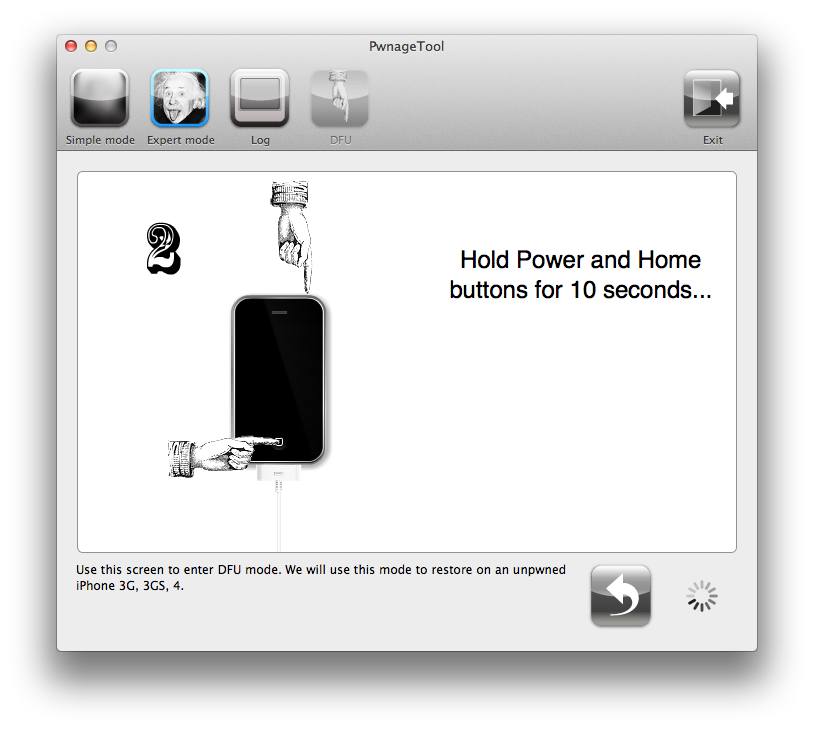 Then release the power button and continue holding the home button for 10 seconds. 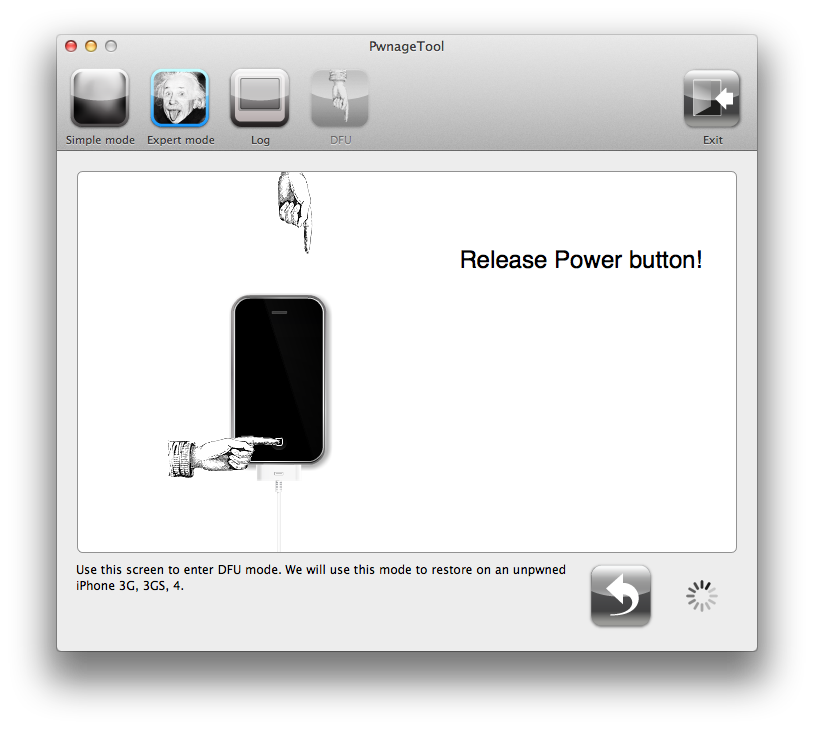 Once your iPhone is successfully in DFU mode, PwnageTool will prompt you to launch iTunes. 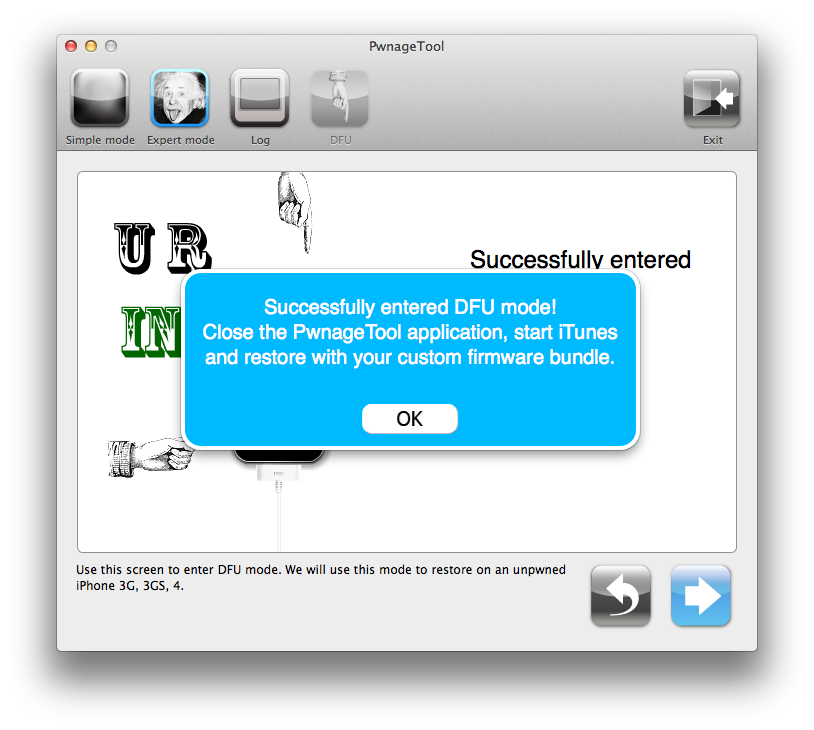 Step Ten Once In iTunes, hold the Alt/Option key and click Restore. 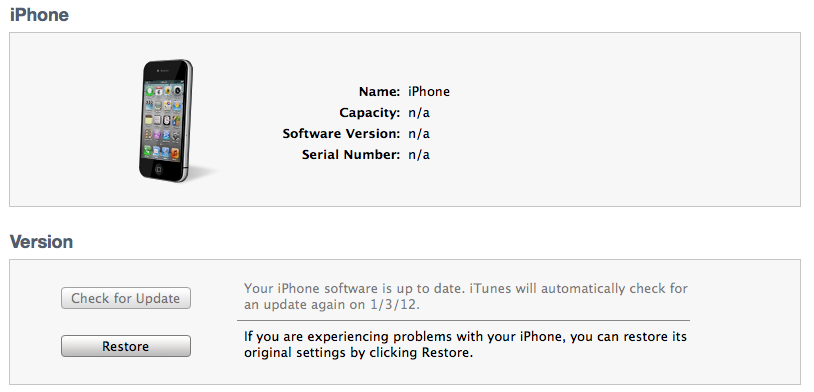 Step Eleven Navigate to the Pwnage folder on your desktop using the dialog window that appears. Select the custom IPSW that was created and click the Choose button. 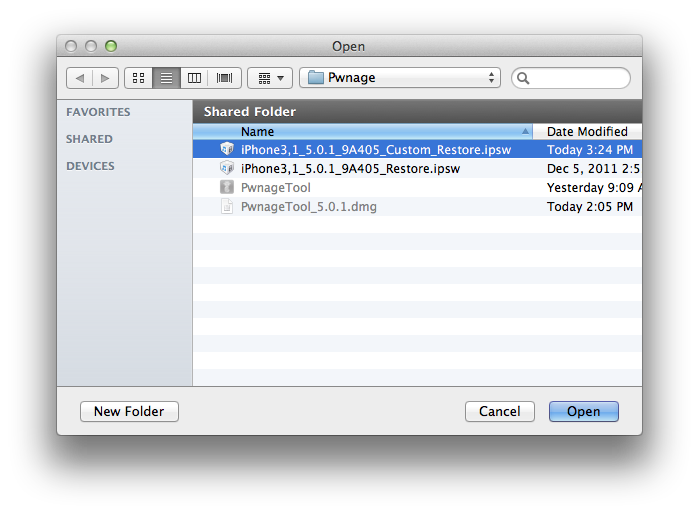 Step Twelve iTunes will now restore the firmware on your iPhone. This can also take up to 10 minutes. Once done you will be rebooted into jailbroken iOS 5.0.1! ***THANKS: Thank you to iPhone Dev-Team, Chronic Dev-Team, Geohot, and pod2g for their hard work in making this jailbreak and tutorial possible! | ||
Showing posts with label 4. Show all posts
Showing posts with label 4. Show all posts
Wednesday, 15 February 2012
How to Jailbreak Your iPhone 4 Using PwnageTool (Mac) [5.0.1]

Where To Download iPhone Firmware Files From
Below you can find the direct links to the iPhone Firmware Files for every released firmware version. Please note that if you use Safari you must disable the auto unzip feature. It may be easier to just use Firefox!
1.0.0: iPhone1,1_1.0_1A543a_Restore.ipsw
1.0.1: iPhone1,1_1.0.1_1C25_Restore.ipsw
1.0.2: iPhone1,1_1.0.2_1C28_Restore.ipsw
1.1.1: iPhone1,1_1.1.1_3A109a_Restore.ipsw
1.1.2: iPhone1,1_1.1.2_3B48b_Restore.ipsw
1.1.3: iPhone1,1_1.1.3_4A93_Restore.ipsw
1.1.4: iPhone1,1_1.1.4_4A102_Restore.ipsw
2.0.0 (2G): iPhone1,1_2.0_5A347_Restore.ipsw
2.0.0 (3G): iPhone1,2_2.0_5A347_Restore.ipsw
2.0.1 (2G): iPhone1,1_2.0.1_5B108_Restore.ipsw
2.0.1 (3G): iPhone1,2_2.0.1_5B108_Restore.ipsw
2.0.2 (2G): iPhone1,1_2.0.2_5C1_Restore.ipsw
2.0.2 (3G): iPhone1,2_2.0.2_5C1_Restore.ipsw
2.1.0 (2G): iPhone1,1_2.1_5F136_Restore.ipsw
2.1.0 (3G): iPhone1,2_2.1_5F136_Restore.ipsw
2.2.0 (2G): iPhone1,1_2.2_5G77_Restore.ipsw
2.2.0 (3G): iPhone1,2_2.2_5G77_Restore.ipsw
2.2.1 (2G): iPhone1,1_2.2.1_5H1_Restore.ipsw
2.2.1 (3G): iPhone1,2_2.2.1_5H11_Restore.ipsw
3.0.0 (2G): iPhone1,1_3.0_7A341_Restore.ipsw
3.0.0 (3G): iPhone1,2_3.0_7A341_Restore.ipsw
3.0.0 (3GS): iPhone2,1_3.0_7A341_Restore.ipsw
3.0.1 (2G): iPhone1,1_3.0.1_7A400_Restore.ipsw
3.0.1 (3G): iPhone1,2_3.0.1_7A400_Restore.ipsw
3.0.1 (3GS): iPhone2,1_3.0.1_7A400_Restore.ipsw
3.1.0 (2G): iPhone1,1_3.1_7C144_Restore.ipsw
3.1.0 (3G): iPhone1,2_3.1_7C144_Restore.ipsw
3.1.0 (3GS): iPhone2,1_3.1_7C144_Restore.ipsw
3.1.2 (2G): iPhone1,1_3.1.2_7D11_Restore.ipsw
3.1.2 (3G): iPhone1,2_3.1.2_7D11_Restore.ipsw
3.1.2 (3GS): iPhone2,1_3.1.2_7D11_Restore.ipsw
3.1.3 (2G): iPhone1,1_3.1.3_7E18_Restore.ipsw
3.1.3 (3G): iPhone1,2_3.1.3_7E18_Restore.ipsw
3.1.3 (3GS): iPhone2,1_3.1.3_7E18_Restore.ipsw
4.0.0 (3G): iPhone1,2_4.0_8A293_Restore.ipsw
4.0.0 (3GS): iPhone2,1_4.0_8A293_Restore.ipsw
4.0.0 (4): iPhone3,1_4.0_8A293_Restore.ipsw
4.0.1 (3G): iPhone1,2_4.0.1_8A306_Restore.ipsw
4.0.1 (3GS): iPhone2,1_4.0.1_8A306_Restore.ipsw
4.0.1 (4): iPhone3,1_4.0.1_8A306_Restore.ipsw
4.0.2 (3G): iPhone1,2_4.0.2_8A400_Restore.ipsw
4.0.2 (3GS): iPhone2,1_4.0.2_8A400_Restore.ipsw
4.0.2 (4): iPhone3,1_4.0.2_8A400_Restore.ipsw
4.1.0 (3G): iPhone1,2_4.1_8B117_Restore.ipsw
4.1.0 (3GS): iPhone2,1_4.1_8B117_Restore.ipsw
4.1.0 (4): iPhone3,1_4.1_8B117_Restore.ipsw
4.2.1 (3G): iPhone1,2_4.2.1_8C148_Restore.ipsw
4.2.1 (3GS): iPhone2,1_4.2.1_8C148a_Restore.ipsw
4.2.1 (4): iPhone3,1_4.2.1_8C148_Restore.ipsw
4.2.6 (4 CDMA): iPhone3,3_4.2.10_8E600_Restore.ipsw
4.3.0 (3GS): iPhone2,1_4.3_8F190_Restore.ipsw
4.3.0 (4 GSM): iPhone3,1_4.3_8F190_Restore.ipsw
4.3.1 (3GS): iPhone2,1_4.3.1_8G4_Restore.ipsw
4.3.1 (4 GSM): iPhone3,1_4.3.1_8G4_Restore.ipsw
4.3.2 (3GS): iPhone2,1_4.3.2_8H7_Restore.ipsw
4.3.2 (4 GSM): iPhone3,1_4.3.2_8H7_Restore.ipsw
4.2.7 (4 CDMA): iPhone3,3_4.2.7_8E303_Restore.ipsw
4.2.8 (4 CDMA): iPhone3,3_4.2.8_8E401_Restore.ipsw
4.3.3 (3GS): iPhone2,1_4.3.3_8J2_Restore.ipsw
4.3.3 (4 GSM): iPhone3,1_4.3.3_8J2_Restore.ipsw
4.2.9 (4 CDMA): iPhone3,3_4.2.9_8E501_Restore.ipsw
4.3.4 (3GS): iPhone2,1_4.3.4_8K2_Restore.ipsw
4.3.4 (4 GSM): iPhone3,1_4.3.4_8K2_Restore.ipsw
4.2.10 (4 CDMA): iPhone3,3_4.2.10_8E600_Restore.ipsw
4.3.5 (3GS): iPhone2,1_4.3.5_8L1_Restore.ipsw
4.3.5 (4 GSM): iPhone3,1_4.3.5_8L1_Restore.ipsw
5.0 (3GS): iPhone2,1_5.0_9A334_Restore.ipsw
5.0 (4 GSM): iPhone3,1_5.0_9A334_Restore.ipsw
5.0 (4 CDMA): iPhone3,3_5.0_9A334_Restore.ipsw
5.0 (4S): iPhone4,1_5.0_9A334_Restore.ipsw
5.0.1 (3GS): iPhone2,1_5.0.1_9A405_Restore.ipsw
5.0.1 (4 GSM): iPhone3,1_5.0.1_9A405_Restore.ipsw
5.0.1 (4 CDMA): iPhone3,3_5.0.1_9A405_Restore.ipsw
5.0.1 (4S): iPhone4,1_5.0.1_9A405_Restore.ipsw
5.0.1 (4S) [9A406]: iPhone4,1_5.0.1_9A406_Restore.ipsw
NOTE*: I will update this as new firmware versions come out of course :)
Tuesday, 14 February 2012
How to Put an iPhone Into DFU Mode
DFU means Device Firmware Update. If a restore using Recovery Mode doesn't work you will want to use DFU Mode as a last resort. When placing your iPhone into DFU Mode it does not load the OS before attempting the restore Watch the Video! Watch the Video!For your convenience this tutorial is available in video format also. Click the Watch It button to view the tutorial! To put the iPhone into DFU mode so you can do an iTunes firmware restore follow these steps: Step One Open iTunes and connect the iPhone to your Mac.  Step Two Press and hold the Home button and the Sleep/Wake button at the same time. 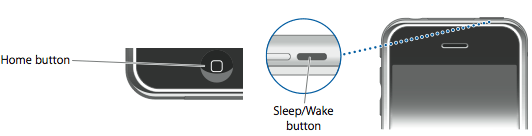 Step Three After exactly 10 seconds release the Sleep/Wake button. Continue holding the home button until you iTunes pops up a message telling you that it has detected an iPhone in recovery mode. 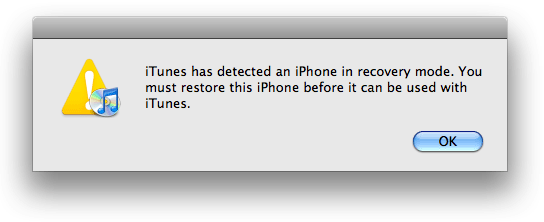 The iPhone screen will remain black like this:  NOTE***: It may take a few attempts to get your iPhone into DFU mode. Generally, I hold down both buttons then release the Home button just before I think the Apple logo would appear. If you are still holding both buttons down and you see the Apple logo you are holding them down for too long! | ||
How to Update Your iPhone 4 Without Upgrading the Baseband (Mac)
| This tutorial will show you how to upgrade your iPhone 4 to iOS 4.1 without upgrading its baseband using TinyUmbrella for Mac. We recommend reading the TinyUmbrella Read Me located here before doing anything. The Windows version of this tutorial is here. Please Note: This ONLY Works with the iPhone 4! Step One Download TinyUmbrella from here Also make sure to download the iPhone 4 iOS 4.1 Firmware located here  Step Two Double click the downloaded Umbrella.dmg file to mount it. Drag the Umbrella app from the mounted dmg into your Applications folder. Then double click the Umbrella app to launch it.   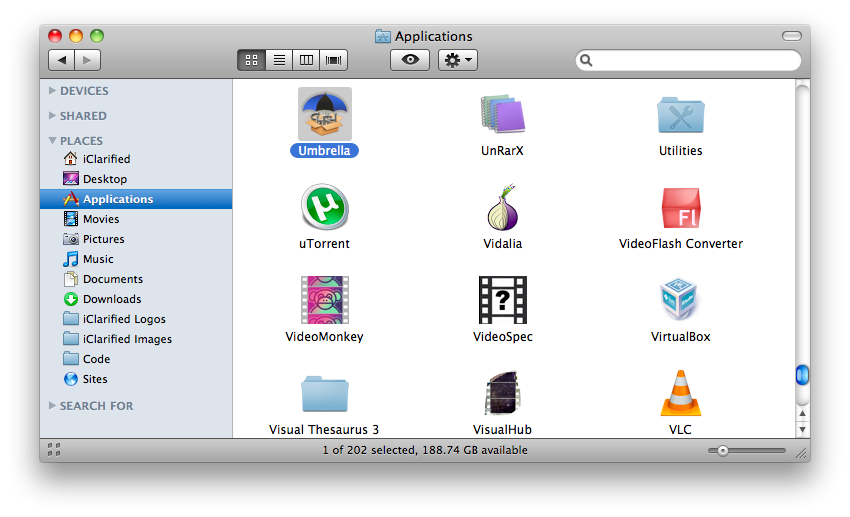 If asked enter your administrative username and password. 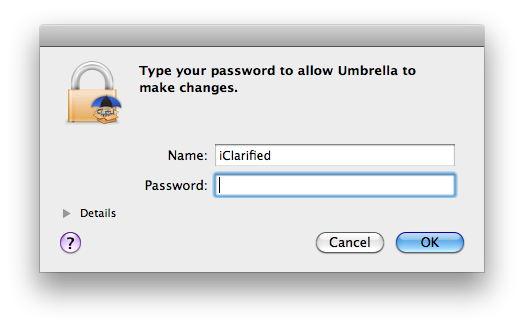 Step Three Make sure the device is connected, and Umbrella has detected the type of device and its firmware. 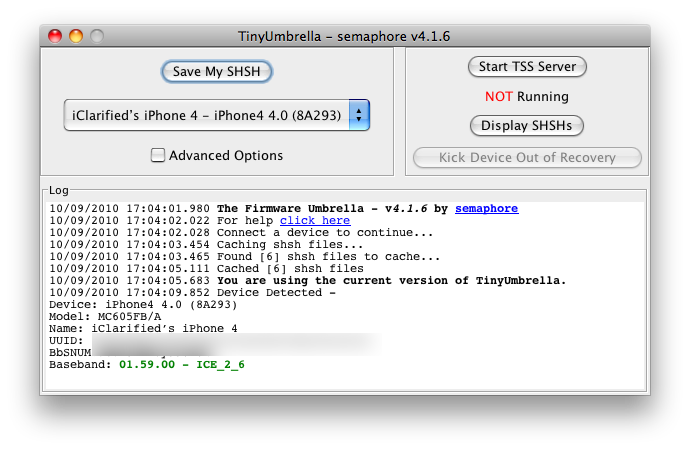 **If you haven't already saved your SHSH blobs then click Save My SHSH. Step Four Hit Start TSS Server and make sure you receive no errors.  Once The TSS Server is "running" successfully, umbrella will kill iTunes. Leave TinyUmbrella Open. 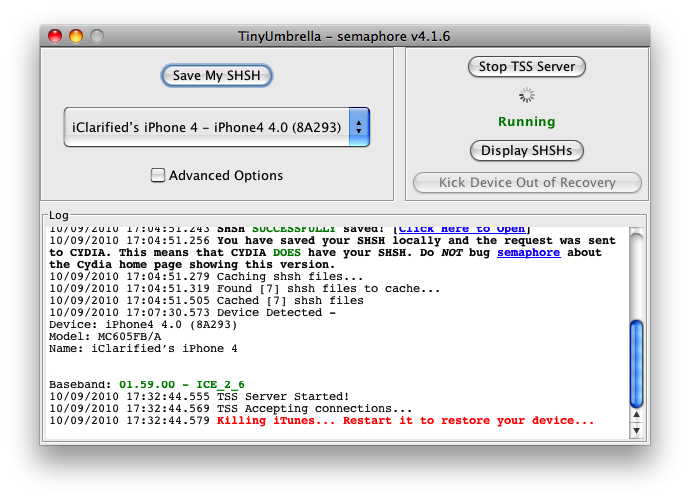 If you do receive an error, DO NOT continue. Your restore will not work if the TSS server cannot be started. Step Five Open iTunes and Hit Shift+ Restore. 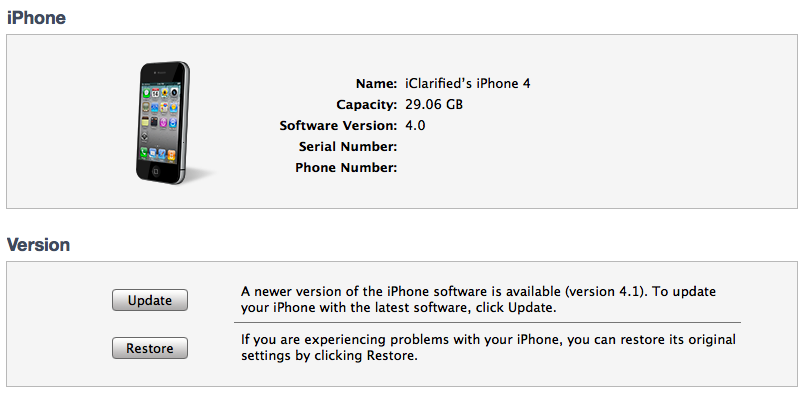 Browse to and select the iPhone 4.1 Firmware File. 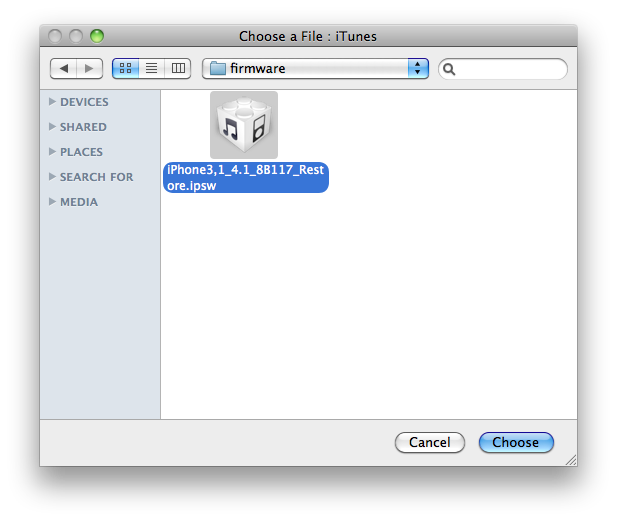 Hit OK to Restore iPhone 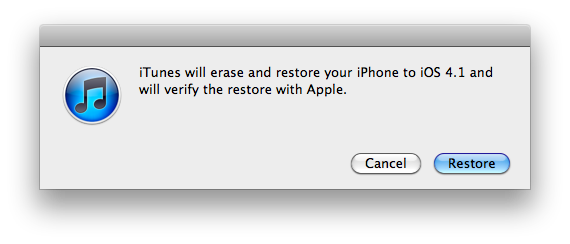 Step Six iTunes should give you error 1004. This is what we wanted, as it notes the baseband has not updated :) Step Seven Go back to the TinyUmbrella window and Click Kick Device Out of Recovery  *If you have issues here, try closing and re-opening TinyUmbrella. Your iPhone will now be on 4.1 with the 1.59.00 baseband! (Which means you can now unlock using this tutorial) 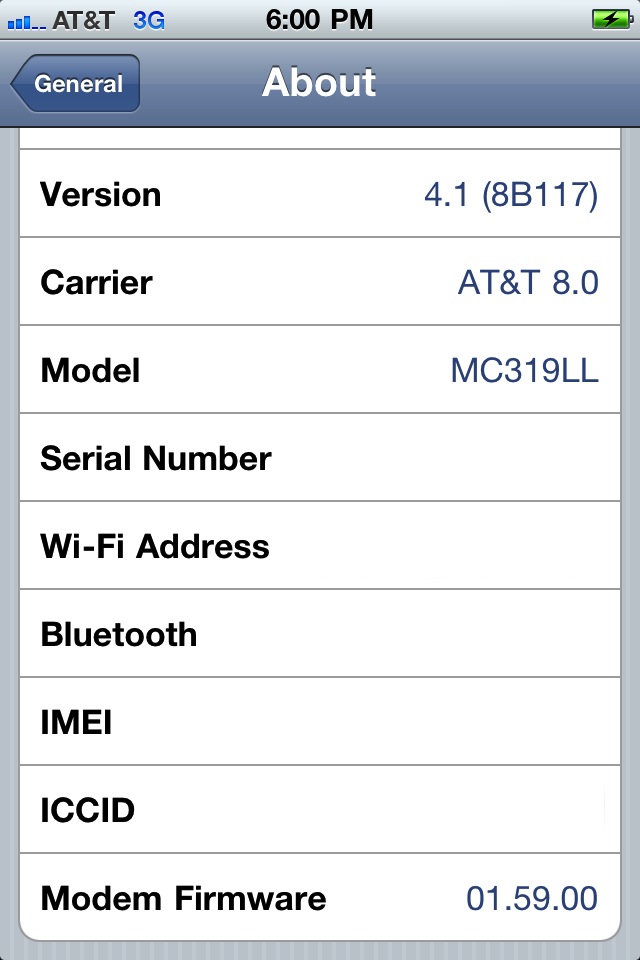 **Thanks to semaphore for his work on this tool | ||
Jailbreak
How to Jailbreak Your iPhone 4S Using Absinthe (Windows) [5.0, 5.0.1]
How to Jailbreak Your iPhone 4S Using Absinthe (Mac) [5.0, 5.0.1]
How to Perform an Untethered Jailbreak of Your iPhone 4 (Windows) [5.0.1]
How to Jailbreak Your iPhone 4 Using PwnageTool (Mac) [5.0.1]
How to Perform an Untethered Jailbreak of Your iPhone 3GS (Mac) [5.0.1]
How to Jailbreak Your iPhone 3GS, iPhone 4 Using Limera1n (Windows)
How To Jailbreak Your iPhone 3GS, iPhone 4 Using Grrenpois0n (Windows)
How to Jailbreak Your iPad Using JailbreakMe [3.2.0, 3.2.1]
How to Jailbreak Your iPhone Using JailbreakMe [4.0.0, 4.0.1]
How to Unlock the iPhone 4, 3GS, 3G Using UltraSn0w
iPad | How to Jailbreak Your iPad Using Spirit (Windows) [3.2]
How to Jailbreak and Unlock Your iPhone 3G, 3GS Using BlackSn0w [Mac]
Jailbreak Your iPhone 3GS on OS 3.0.x Using RedSn0w (Windows)
How to Jailbreak Your iPhone 4S Using Absinthe (Mac) [5.0, 5.0.1]
How to Perform an Untethered Jailbreak of Your iPhone 4 (Windows) [5.0.1]
How to Jailbreak Your iPhone 4 Using PwnageTool (Mac) [5.0.1]
How to Perform an Untethered Jailbreak of Your iPhone 3GS (Windows) [5.0.1]
How to Jailbreak Your iPhone 3GS Using PwnageTool (Mac) [5.0.1]
How to Jailbreak Your iPhone 3GS, iPhone 4 Using Limera1n (Windows)
How To Jailbreak Your iPhone 3GS, iPhone 4 Using Grrenpois0n (Windows)
How to Jailbreak Your iPad Using JailbreakMe [3.2.0, 3.2.1]
How to Jailbreak Your iPhone Using JailbreakMe [4.0.0, 4.0.1]
How to Unlock the iPhone 4, 3GS, 3G Using UltraSn0w
iPad | How to Jailbreak Your iPad Using Spirit (Windows) [3.2]
How to Jailbreak and Unlock Your iPhone 3G, 3GS Using BlackSn0w [Mac]
Jailbreak Your iPhone 3GS on OS 3.0.x Using RedSn0w (Windows)
How to Unlock the iPhone 4, 3GS, 3G Using UltraSn0w
These are instructions on how to unlock the iPhone 4, iPhone 3GS, and iPhone 3G for use with any GSM cellphone carrier using UltraSn0w. This will work with the iOS 4.0 firmware.
Before you can follow these instructions you must have a jailbroken iPhone and you must be on the 04.26.08, 05.11.07, 05.12.01, 05.13.04, or 01.59 baseband(modem firmware).
To find your firmware and modem firmware(baseband) versions you can follow this tutorial.
If you are on T-Mobile remember to turn off 3G before starting...
Watch the Video!
For your convenience this unlock tutorial is available in video format also. Click the Watch It button to view the tutorial!
Step One
Press to launch Cydia Installer from your SpringBoard.

Step Two
Press to select the Manage tab at the bottom of the screen.

Step Three
Press to select the large Sources button

Step Four
If the ultrasn0w repo is not present press the Edit button at the top right of the screen. Otherwise, skip to Step Nine.

Step Five
Press the Add button at the top left of the screen.

Step Six
Enter http://repo666.ultrasn0w.com/ as the source url and press the Add Source button.

Step Seven
Once the source has been added press the large Return to Cydia button.

Step Eight
Press the Done button at the top right of the screen.

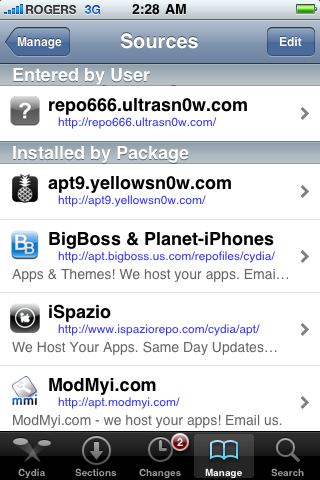
Step Nine
Press to select repo666.ultrasn0w.com from the list of user entered sources.

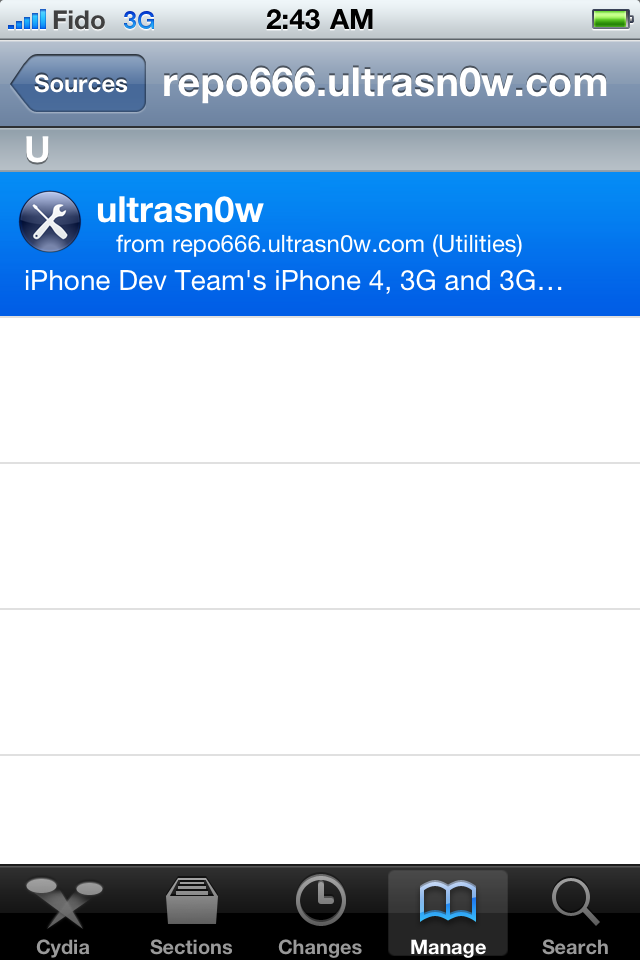
Step Ten
Press to select ultrasn0w from the list of packages

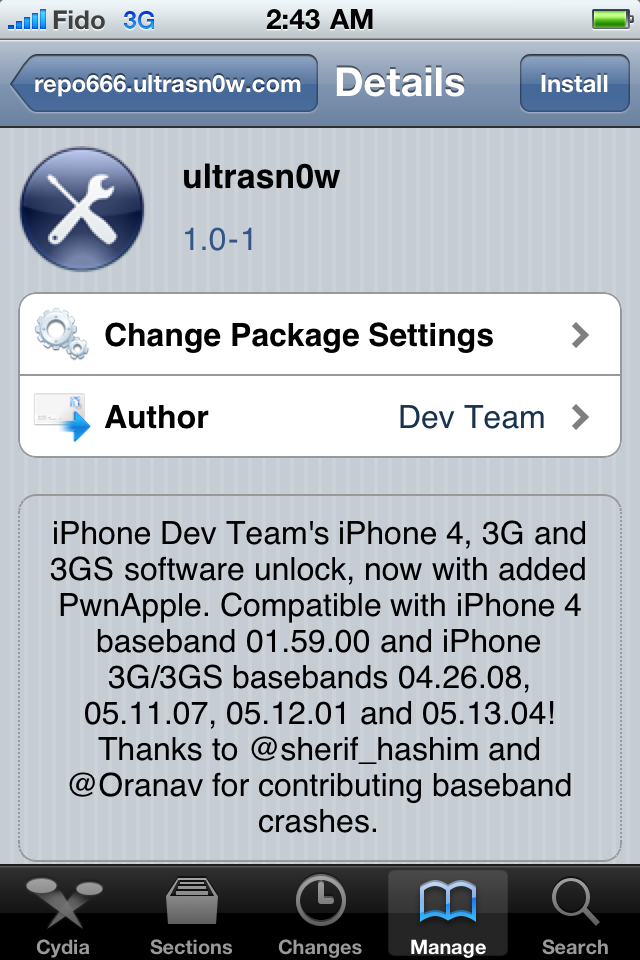
Step Eleven
Press the Install button at the top right of the screen.

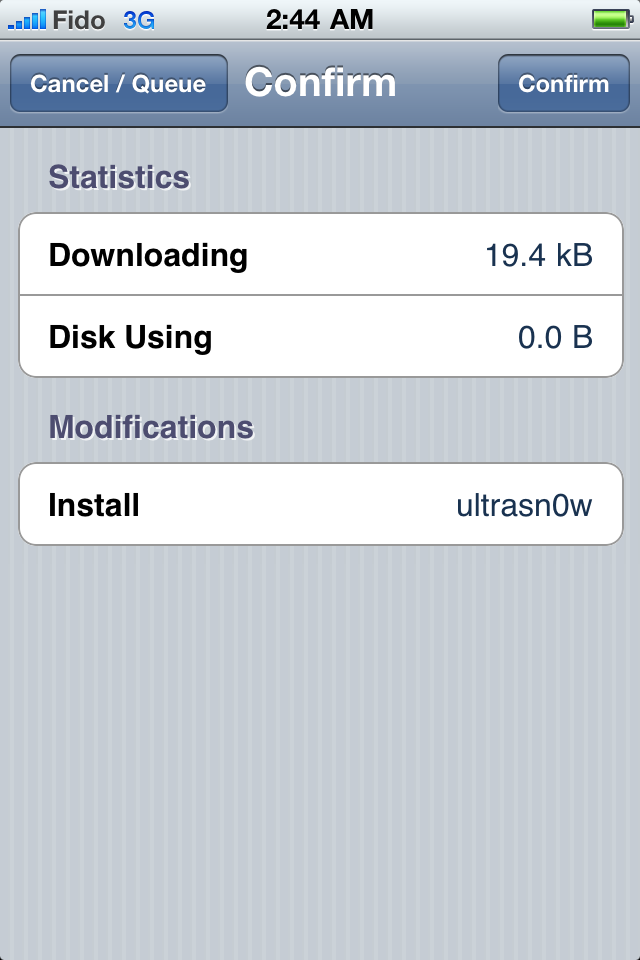
Step Twelve
Press the Confirm button at the top right of the screen.

Step Thirteen
After installation completes successfully press the large Return to Cydia button.

Step Fourteen
Now press the Home button then power off and power on the iPhone. You do this by holding down the power button for 3 seconds then moving the power slider that appears to the right. Press the power button again to turn on the phone.

Step Fifteen
You should now be able to insert the SIM of your choice!


***THANKS: A big thank you to all the members of the iPhone Dev-Team for all their hard work! It is much appreciated by all.
Before you can follow these instructions you must have a jailbroken iPhone and you must be on the 04.26.08, 05.11.07, 05.12.01, 05.13.04, or 01.59 baseband(modem firmware).
To find your firmware and modem firmware(baseband) versions you can follow this tutorial.
If you are on T-Mobile remember to turn off 3G before starting...
Watch the Video!For your convenience this unlock tutorial is available in video format also. Click the Watch It button to view the tutorial!
Step One
Press to launch Cydia Installer from your SpringBoard.
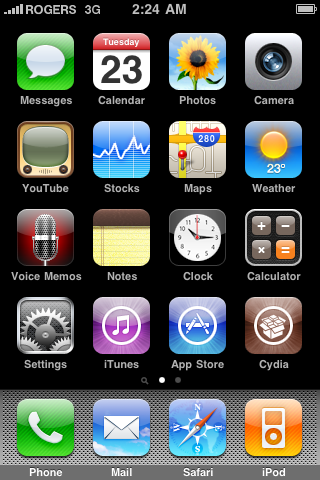
Step Two
Press to select the Manage tab at the bottom of the screen.
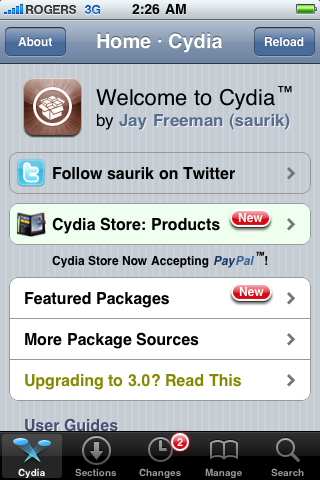
Step Three
Press to select the large Sources button
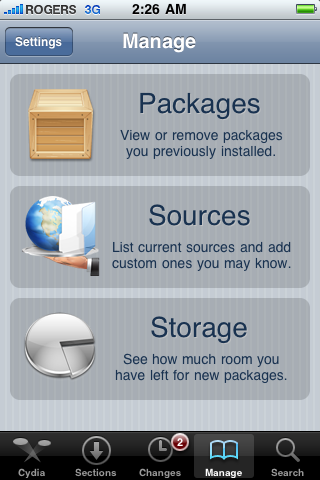
Step Four
If the ultrasn0w repo is not present press the Edit button at the top right of the screen. Otherwise, skip to Step Nine.
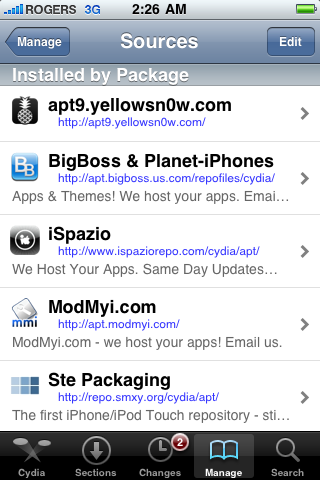
Step Five
Press the Add button at the top left of the screen.
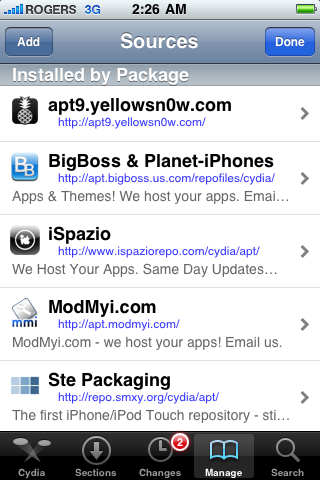
Step Six
Enter http://repo666.ultrasn0w.com/ as the source url and press the Add Source button.
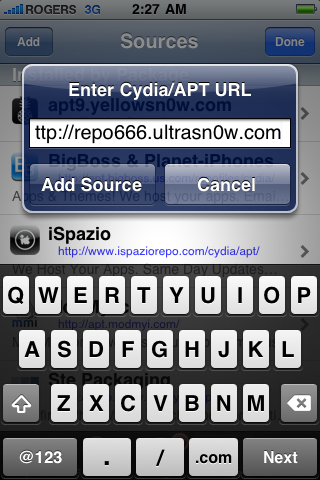
Step Seven
Once the source has been added press the large Return to Cydia button.

Step Eight
Press the Done button at the top right of the screen.
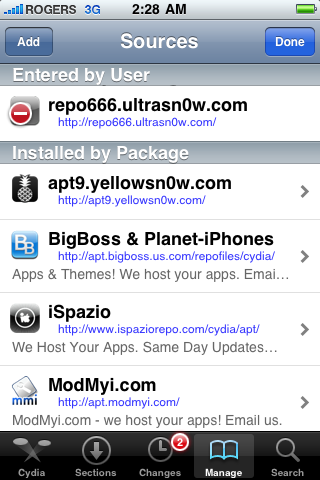
Step Nine
Press to select repo666.ultrasn0w.com from the list of user entered sources.
Step Ten
Press to select ultrasn0w from the list of packages
Step Eleven
Press the Install button at the top right of the screen.
Step Twelve
Press the Confirm button at the top right of the screen.
Step Thirteen
After installation completes successfully press the large Return to Cydia button.
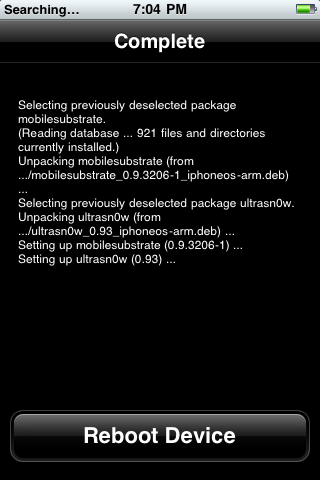
Step Fourteen
Now press the Home button then power off and power on the iPhone. You do this by holding down the power button for 3 seconds then moving the power slider that appears to the right. Press the power button again to turn on the phone.

Step Fifteen
You should now be able to insert the SIM of your choice!
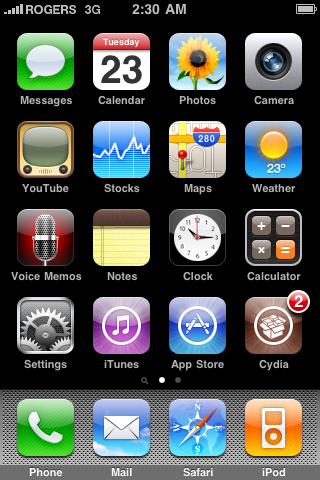
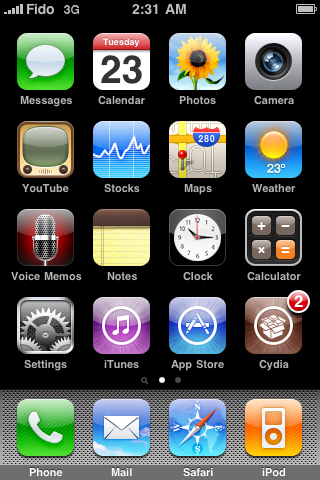
***THANKS: A big thank you to all the members of the iPhone Dev-Team for all their hard work! It is much appreciated by all.
Subscribe to:
Posts (Atom)